This is most definitely not one of my typical travel blogs, because it's all about a
project and not a trip.
Although some will say "this is quite the trip you are on with this old truck."

The Milkshaker Part 2 - Construction
Aside from sharing cool 50's GMC pictures and discussions on my Milkshaker updates, the 55-59 GMC Trucks facebook group also connected me with Gabriel in California. He has decades of experience with very shiny things, specifically the chrome bumper and grille pieces that can make these old trucks look amazing. I sent some of my pieces down to him for restoration and chroming, and he has sent pieces of very shiny art back to me (via my Blaine, WA mailbox). The Milkshaker will sparkle when these are installed.


Milkshaker Update #12
Today was all about ventilation. I cut out the old roof vents and replaced them with Maxair mini vents, they are waterproof, include a fan and LED lighting that this truck will be needing. Once the replacement roof panels are in, they will be sealed and secured.


VINs, Numbers and Registration
When you're restoring an old vehicle like this it's really important to have a clear understanding of the make, model and other specifics in order to properly restore it to original specifications and find the correct replacement parts. The key to knowing a lot of this information is the VIN # and build plates attached to the firewall.


The VIN on the Milkshaker is 694316XXXXX
The first digit identifies the year - 6 = 1956
The second digit identifies the make - 1=Chevrolet, 9 = G.M.C.
The third digit identifies the series - 3=9300 aka 1/2 ton, 4 = 9420/9430
The fourth digit identifies the wheelbase - 2=9420 aka 3/4 ton, 3 = 9430 135" aka 1 ton
The fifth digit identifies the equipment on the chassis - 1 = Flat Face Cowl
The sixth digit identifies the number of cylinders - 6 = 6 cylinders
The remaining five figures indicate the vehicle number
Milkshaker Update #13: Getting registered
When you are buying an old car I would always suggest making sure to buy one that includes the registration papers to go along with your Bill of Sale. If the vehicle was last registered out of province, or out of country there is other processes you also have to follow. But sometimes you have an opportunity for a vehicle that’s too good to turn down and the owner doesn’t have the papers for it.

Starting in late September I have been trying to work with ICBC to get this vehicle registered, and it took a lot of patience, a lot of time with an Autoplan agent on the phone with ICBC while I quietly sat there, and a lot of hoops for almost 11 weeks before it was finally registered in my name. If you are interested to know the steps, here's what I went through...
Step 1 - ensure your Bill of Sale contains all the correct information; the date, vehicle description including Year, Make, and Model, Vehicle Identification #, Sellers name, address and vehicle location, as well as the Buyers name and address, and especially the agreed purchase price.
Step 2 - a letter requesting the last registered owners information is sent to ICBC along with a Cheque for $7

Step 3 - wait
Step 4 - ICBC mails you a photocopy of the last registration document that was filed. In my case it was last registered in 1977 to a man in Delta. Pay to send a registered letter to the last registered owner of the vehicle requesting the registration papers and include ownership transfer papers for them to sign.
Step 5 - wait
Step 6 - When the registered letter is returned to you from Canada Post as Refused “No Such Person”, DO NOT OPEN IT!

Step 7 - this is when you take your Bill of Sale, the letter from ICBC and the photocopy of the old registration, as well as the still sealed registered letter to your Autoplan agent. Be prepared to have them sit on the phone with ICBC for a long long time before they tell you to complete another step.
Step 8 - prepare an "Unregistered Vehicles and Missing Signatures Declaration" (MV1484) form and pay a Notary Public to sign and stamp it. Basically it is just a written list of what the vehicle is, and everything you have done to prove ownership.
Step 9 - return to your Autoplan agent and prepare to have them be on the phone with several different departments at ICBC for hours. This is when you find out that the original registration # for your truck has been recycled and re-assigned to another vehicle so they can’t use that #.
Step 10 - ICBC May ask the agent to do a physical sighting of the vehicle identification number that is on a plate attached to your vehicle. That means driving the agent to your home and showing him the vehicle and VIN plate.
Step 11 - each time the Autoplan agent calls ICBC he gets a different person and has to go through all the steps that have been done already, and you may get someone who asks you to fill out a “vehicle restoration” document that is supposed to be for vehicles purchased out of province or country and undergoing a restoration.
Step 12 - return to Autoplan agent with the "Registration Application for a Vehicle in Restoration" (MV1458) document and specified photos of the vehicle so they can be emailed to ICBC for review.
Step 13 - wait
Step 14 - when contacted by your Autoplan agent that it is good to go,
and you can come back in, bring all of your documents from the previous steps in. Now is
when you wait while another phone call is made to a new ICBC representative that has to be
stepped through every single step that has been followed and find out that you didn’t have
to do Step 11 and 12. 

Step 15 - eventually ICBC will ask how much your vehicle weighs. I was provided the weight by the transporter based on his weights travelling through the Highway Weigh Scales, their response was “is there supporting documents to prove this?”… NO
Step 16 - finally ICBC will provide a new registration #, the very patient but frustrated Autoplan agent will hang up the phone. Now the agent will fill out ownership transfer papers, take your Bill of Sale, the photocopy of the old registration info, the notarized MV1484 document and the unopened registered letter that was returned.
Step 17 - after paying the GST and a registration fee the Autoplan Agent provides you the new registration papers in your name. These are what you will use to actually insure your vehicle when it is ready.
- OR-
Step 1 - Make arrangements with someone like Mark Zomar who will take care of all the previous steps for a nominal fee.

I started this process on September 25th and finally received my registration papers on December 7th… you have to be patient, nothing happens fast with ICBC.
Milkshaker Update #14
Along with cutting out some rusty floorboard sections, my buddy Callum and I did a test fit of the prototype back doors and door slamming hardware that I acquired through Mill Valley Supply. Our plan is to create a functioning prototype of wood that we can then wrap in aluminum, and insert a window in each door similar to the jackknife doors up front.


With lots of visiting and Christmastime activities, I shifted my focus a little to cleaning up and working on the logo that will appear on the sides of the truck. The initial mockup that I did used someone else's art, and I knew I would have to replace it down the line. I did track down the artist MemoAngeles, and paid him a small fee for the use of his image in a non-commercial use. As an inspiration for what it would eventually become, it was well worth it.


I have been sharing the ongoing updates with my Facebook friends as I go, so I created 3 new cow art pieces to gather feedback from my followers. Overwhelmingly one new cow was liked by most people, although the steroid ridden bull received a lot of compliments.


Taking the feedback I received from an incredibly supportive community, I created a new version of the favourite cow that used a simpler colour palette, and re-drew it with easier to print lines, and a brand new milk splash with Milk Shaker branding.


Some additional feedback from some artist friends and I have a new Milkshaker logo
Milkshaker Update #15
After a short Christmas break, I got back out side to do some metalwork before the snow started falling. I knew that there was some rough and rusty spots on the floorboards around the pedals, as there typically is in a 67 year old truck. When you pull the inner fender and outer fender off, you can really see how bad it was.

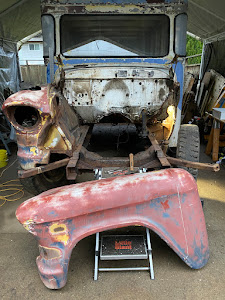


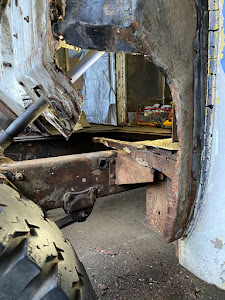
All you can do at this stage is start cutting away the rotten sections, and start planning how to replace them with new metal. KMS C.A.R. Parts and Old Car Centre carry replacement floor patch panels, the rest would be cutting and welding in new steel. Before any floor patching could start, I had to repair the cab support beam that was in pretty rough shape.


I'm not the best rookie welder out there, but I'm pretty happy with how two new pieces of steel made the cab support piece rock solid again. Now I could move on to cutting and fitting the drivers side floor panel.


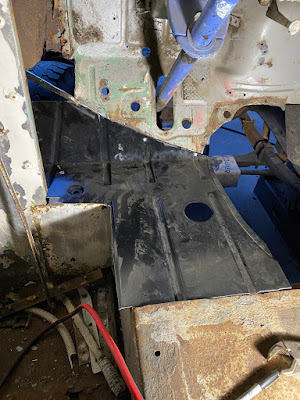
Next up is welding the piece in place, re-securing the cab to the frame and then removing the rotted passenger side metal. Once the panels are in place, I can start looking at replacing the other sheet metal I had to cut out.

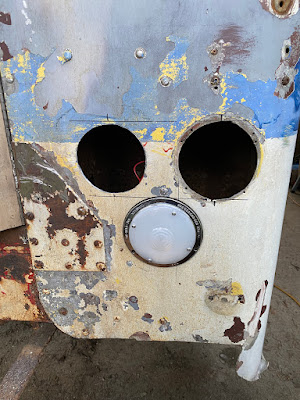
If you remember what the back lights of the truck used to look like, you knew they couldn't stay that way.


After removing the existing lights, as well as the 2 cover plates on the driver's side, there was a unique triangle layout, that would work well with the vintage 1950's OEM lights that I acquired... a Red, a Yellow and a White lens with chrome trim. A whole bunch of measuring, measuring again, lines, levels and a jigsaw ended up with matching sides for a future lighting project.


Milkshaker Update #16
snowy days and sub-zero temps had me working inside. Cleaning up and restoring the bumper brackets, and pre-assembling these very shiny grille and bumper pieces.


Before anything can be assembled, there is some cleanup involved, Scraping/Sanding, Rust conversion, and Painting.


Before & After of the ugly side of the Bumper/Grille
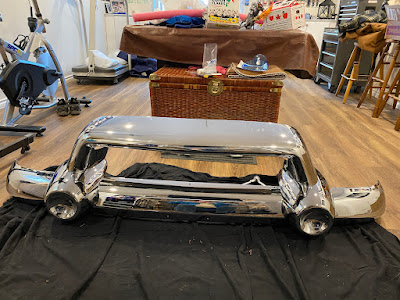


The supervisor was on the job site today, and needed to inspect every assembled unit.


Next up is the filler plate and model # bar and brackets. This will be a future update with all kinds of details.
Milkshaker Update #17
The snow and cold temps are gone, so it’s back outside to weld in the floorboard patch panel, replace 1 cab mount, and start planning for more metal replacement


Welded in place with shiny new cab mount bolt. Includes an access hole for frame mount master cylinder.


The new drivers side cab mount and rubber spacer


I may need to replace this cab mount on passenger side


On the drivers side floorboard a Texas sized hole still remains... it's on my list.
Milkshaker Update #18
I am constantly watching the classified ads and FB marketplace looking for deals to pop up on necessary parts. When this deal popped up for a full set of wheels and tires, I had to go check them out. Papa got a new pair of GMC shoes. The new rims may need a little salt damage repair, but I think they look way better.


The original 1956 Split rims with 7.5 - 17” tires were never going to stay on this project. They are extremely dangerous, not just for driving, but working on the rims themselves can be deadly... they have the nickname "widowmakers". A set of 20” rims with 275/60/20 tires look much more suitable


In 2011 GM decided to change the lugs from 8x6.5 to 8x180. These adapters solve that and set the wheels 1.5” wider. Don't ask me what that cable is wrapped around the drum, and certainly don't ask me why it was there.
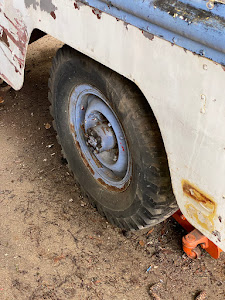


Even a couple inches larger than the originals, the wheels don’t look oversized and fit well in the fenders.


I'm sure someone, with more of a deathwish than I have, will want this set of wheels.

Milkshaker Update #19
Been a little while since I have posted (travel, health, weather, etc.) back at it now that it’s getting warmer… the drivers side step is finally taking shape after cutting out old rusty bits. Just one more piece and a little more welding to go, then onto the passenger side.


Milkshaker Update #20
I moved over to the passenger side floorboard/firewall area. The rust wasn’t as extensive, but it went deeper, the cab mount support was not repairable and I had to replace it. Also… fire resistant does not mean fireproof. Apparently a grinder can generate enough heat to ignite a fire resistant work shirt.Only damage was a hole in the shirt, and a melted GMC Truck club T-Shirt.


Milkshaker Update #21
While rust is being replaced with new metal, I have also been working on the 305 motor
with my friend Pete…
Cam, lifters, Valves, Rockers, etc...


Assembly is not the only part of building an engine, it also includes cleaning and painting. I made the choice to match the colour to both the Milkshaker Blue and the GM Blue of the engines era.


With the engine mostly assembled, we took the time to rebuild the Quadrajet Carburetor that will fuel the 305.


We did an oil pressure test, and wrapped up the motor while I get the truck ready. Next step will be test fitting in the truck.
Milkshaker Update #22
I got sidetracked by a couple things, first was a trip to the Portland Swap Meet where I found some key pieces for the truck; a hood, a steering wheel, an air cleaner cover, a license plate light, and even some cheap coveralls.


I also picked up a new rear axle for the truck this week, the 5.14 geared axle from 1996 is being replaced with a 2011 Suburban rear axle with 3.73 gears and disc brakes.

The second sidetrack was having a second classic vehicle, Lucille, my 57 Chevy Wagon, had to have her radiator repaired, and a bunch of other cooling system upgrades to get ready for car show season which starts on April 28th.


